Showing posts with label leggings. Show all posts

Thursday, 26 January 2012

PHOTOGRAPHS OF MY LEGGINGS...


After spending hours on my leggings, I finally have a photo! I took part in a photo shoot on Monday and styled my leggings with an appropriate outfit that would get my style across. I am pleased with the outcome and like how the intense background allows my leggings to stand out. These leggings fit the model perfectly on the legs but I had to take it in a little bit at the waist so it would look flattering. Like them?

Monday, 9 January 2012

COMPLETED LEGGINGS...

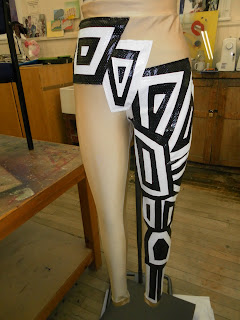
I have finally finished my leggings by attaching the final pieces to the base of my leggings. I had to improvise and create more pieces for the bottom due to the shapes not meeting the bottom so I had yet more shapes to attach but I finally did it. I am very pleased with them except for the crotch area as the piece doesn't quite fit with the stretch in the fabric pulling it away to create creases but hopefully it will look better on the model. That is the only problem with it really but I expected something to go wrong with the shapes as they doesn't go with the stretch of the Lycra. I can't wait now to get them photographed and it's something else to evidence in my portfolio.

Wednesday, 28 December 2011

LEGGINGS PROGRESS...

I'm finally getting there with my leggings, I only have a few more shapes to sew on now. Hopefully I should have completed them in a couple of weeks, when I get back to college. I have now resorted to hand sewing them on due to how I am finding using the machine too difficult and fiddly. I still find it difficult to hand sew the shapes on but I think it is a little bit more easier. Can you see the progress?

Thursday, 15 December 2011

LAY PLANS FOR MY LEGGINGS...

As part of my functional skills criteria for the day I had to attempt to create a lay plan for my leggings creating a different lay plan for three fabrics. I started by measuring the paper to what width and meters needed I needed and started to place my patterns in the most confined spacing to reduce wastage. I completed two and still have one to complete but I shall complete that soon. I found this task a little bit confusing because I got mixed up with how I positioned the pieces so I learned from that mistake and hopefully won't make that mistake again. I also completed a costing sheet which allowed me to work out how much I actually needed not what I thought I needed.

Friday, 9 December 2011

MOVING ON TO FINAL LEGGINGS... WITH PVC

As you have probably guessed I have completed my Toile now for my leggings and can now create my final pair of crazy leggings. I was impressed with myself today as I over locked the notches so they were more accurate and matched correctly. I had a few problems with attaching the PVC to the shell of the leggings but I was expecting that so had to fiddle about with it to reduce the ugliness of it. First of all, I had to sew all the individual pieces together inside each other close to edge in same coloured threads to then tack onto leggings whilst on mannequin to then sew and provide equal pressure to reduce amount of bubbles under the fabric. The first few have gone well but there have been a few problem areas that I didn't know would happen but they aren't that visible.

Saturday, 26 November 2011

CREATING A WAIST BAND FOR MY LEGGINGS...

In yesterday's pattern cutting lesson I managed to finish my leggings with a waistband and cuffs. This was a simple process as I had to fold over the pattern and pin to waist or lower leg and over lock to fabric. I found this quite easy to follow but I need to improve my technique whilst matching notches because I found that the stretch fabric moved and the notches didn't match up. I felt that the waistband work very well and fitted exactly so I was pleased with this method.

Saturday, 19 November 2011

CREATING MY BLOCKS AND PATTERNS FOR LEGGINGS...

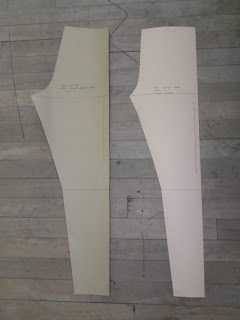
For the last week I have been creating my leggings block for my manufacturing brief as I didn't want to use a trouser pattern. I found this process quite simple following instructions from a Winnie Aldrich book. After I had created that I could move onto patterning and simply traced around the blocks attached the front and back together removing the side seam and drawing 1cm seam allowance and that was my pattern done. I had to use 1cm seam allowance as I am working with stretch fabric so over locking the seams together. If you ever struggle to find a good pattern cutting book I recommend Winnie Aldrich it's simple to follow and has everything in it.