Thursday, 20 January 2011

BATIK...

Last leason we attended a workshop involving the innovative design of Batik. First of all,I was unsure about which observational study I would choose and if it would be successul.
I suppose you've got to experiement thought haven't you?
What I did was experiement with silk and cotton and scrap fabr
ics to expand my research. I used watercolour and ink to idnetitfy the shapes which in my opinion I prefer the ink as it gives a more effective outcome and secures the shapes successfully whereas watercolour fades and isn't as evenly spread.
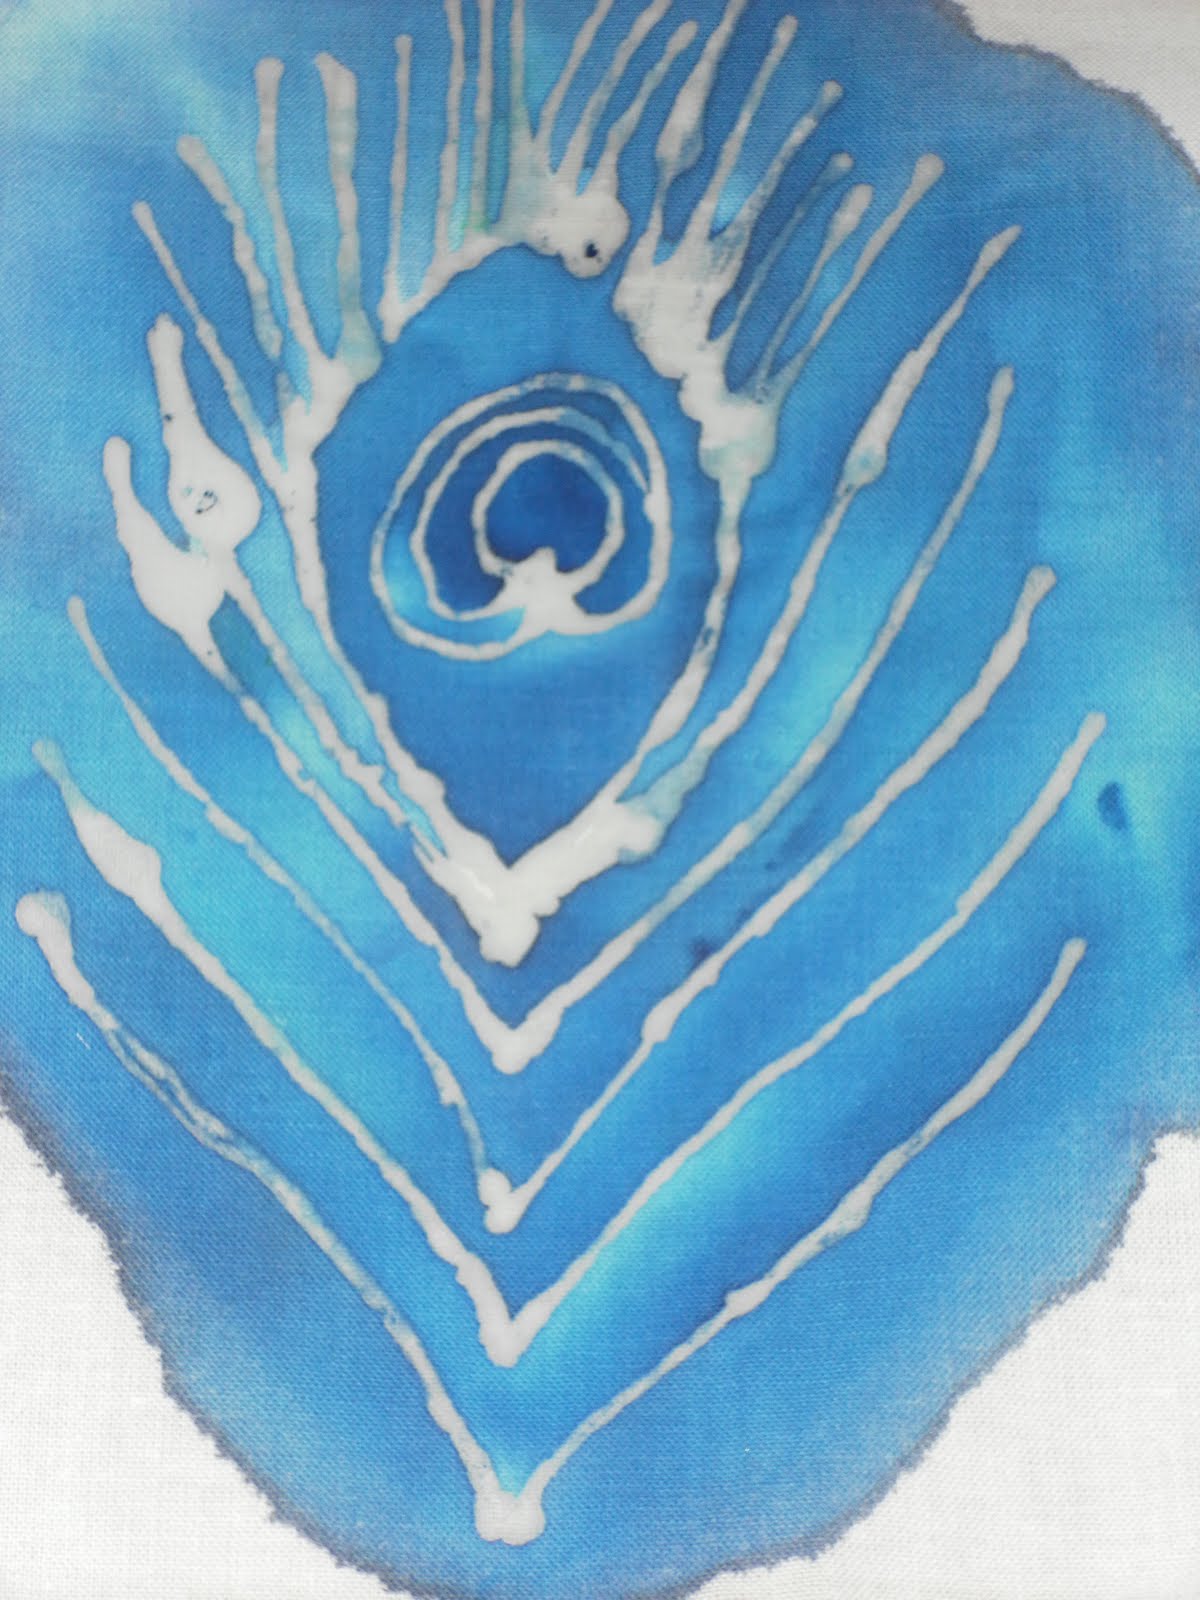
I found this pattern in a magazine and thought it would be an intricate design to copy. I thought my sample is quite accurate but could have been straighter and thinner lines with a slicker precision at the tips.This sample was experiemented on cotton and took roughly 10 minutes with a use of blue ink to reveal the pattern.

Consequently, I wanted to try the same pattern on a different pattern so that's what I did!As you can see the pattern overpowers the
Batik due to the fact the contrast of light and dark has been taking away. This sample was extracted from observational study one taken from the same section used for the collage in fabrics. I decided to change the areas so one was more negatively dominated and the other positiveley dominated.For this sample I used cotton but for the other I used silk to see how the properties differed.I brushed over it with brown ink to surround the colour but I don't think the colour is strong enough and quite weak. I would improve this by adding stitching or overlapping different fabrics to collect more detail as it's hard to identify what section it is.
I sampled observational study 3 and extracted the background outline of the sewing machine and used watercolour to reveal the wax. This was my weakest attempt but my first so I progressed through the lesson with more experience of using the Batik equipment.

REMEMBER: 3 easy steps to create a Batik sample
1. Sketch your design on a plain piece of paper.
2. Layer fabric over paper so you can see the design and follow lines filling with wax from the BatikTjantungs. Peel off paper.
3. Brush over pattern with inks or watercolour and hang up to dry.

HEALTH & SAFTEY
1. Be careful that was doesn't hit the surface of the skin.
2. Keep wax pot away from the wire preventing melting or burning.
3. Act responsibly whilst using Batik Tjantungs and equipment.

OBSERVATIONAL STUDIES

MIXED MEDIA - Last week we have assorted a variation of different objects with a surface patterns to then replicate with a use of different media and materials changing the angle and scale of the drawings.After experimenting at college I decided to attempt it with a mixture of old and contemporary objects. For this observational study I decided to use collage, fabrics, pastels and masking tape giving a contrast in colours and textures even though in the image they are all similar shades and tones.COLLAGE/STITCHING - This attempt was created by blocking the colour out not focusing on the detail of the observation. We then had to stitch into the outlines and details so I personalised it with 3 different colours that I saw in the image and used different stitches to overlap different shapes and patterns. I added buttons to tone down the brightness from the dominating colours.CUTTING HOLES OUT OF PAPER - This observational study was mainly focusing on cutting holes out of which would hold the colour. In this case I layered tracing paper and stitched on top to contrasting from all the neagtive space contrasting with neutral colours. I also used some previous colour mixing plettes of colour to background the holes to give them more vibrance.

In my opinion I don't think these are strong enough so I will continue to adapt these observational studies until I am confident with the outcome. Don't worry you'll be the first to know of any improvements!

Monday, 17 January 2011

NORMA MINKOWITZ

Norma Minkowitz's work consists of shellac - stiffened and painted crochet sculptures that evoke conceptual ideas of pyschological complexities of her work, the observation of human behaviour and the metamorphical containment forming them to give an elegance within the structure. She exploits the labour intensive nature of crocheting into a larger scale but still maintains simplicity of a light design.Minkowitz clones the human form with organic materials and fuses greek mythology to her work to give character and historical content to the work. The figures she forms have limbs absent which give them an individual personnas animating an emotion throughout the body language.Compared to all of the textile designers I have researched I think hers is so innovative with little fabric but morphing shapes expressing self conscious ideas and wordly cocnerns. She represents the female population with sculpting the shape of the real life woman which I find interesting allow me to connect with her work. What are your thoughts and feelings about her work ?


Sunday, 16 January 2011

CHRISTMAS BREAK


During the christmas half term I went to Liverpool with my aunty, sister and cousin scheduled to watch a matinee of Rock 'n' Roll Sleeping Beauty. Consequently, we were early so we decided to explore the cathedral that was allocated in close proximity. Many monuments and ornaments had a surface pattern with detailed religious icons represented in different forms of before and after life. I came across a ceramic piece of art that was beautifully assembled. The colours and shapes were so precise with the ceramic textures giving it a 3 dimensional structure. The mood seeps through this painting with the help of outlines created from the ceramics creating gaps and holes in the piece. The contrast from the clothing of the angels of white and the darkness in the backgroundof the composition showing a deep feeling to this piece of art.

Saturday, 15 January 2011

ALISON WILLOUGHBY

Out of all the textile, ceramic and fine-art artists I found Alison Willoughby the most inspirational due to extravagant designs that tell a story and identitfy different things about her life shown throughout the surface patterns in her work.Her inspiration come from lanes, alleys, passages, streets and terraces – places that are neglected, ever-changing, disintegrating and subsiding.Willoughby uses a wide range of different techniques including moulding, illuminating, screen printing, foiling, mark-making, embroidery, ruffling taylor tacking, cording, sculpturing.I found it difficult recreating her work as it was at such an advanced level so I extracted small sections and used ruffles and gathering with collage to encounter all the bright colours.
Skirt 203 by Alison Willoughby is a skirt made from calico. Calico circles folded into 8 and sewn down in layered lines.

Skirt 246 by Alison Willoughby is a collection of fake and plastic food, feathers, fake flowers and shrubs applied to a canvas skirt base.
Skirt 289 by Alison Willoughby, is a collection of found objects, colours and materials that sit together on a canvas base.
These toys and games are influenced by the profession of her grandfather due to the fact he was a magician. The contrast in colour, width and structures makes me want to analyse it closer as it hides a mystery and shares a child like quality giving it more meaning.
Alison Wiloughby's designs can influence my futuristic accessory design giving me the idea to equip my accessory with a story significant to me.How interesting?
WHAT DO YOU THINK?

WAIST FACING WITH CB FASTENING

Throughout the process of creating a waist facing with a CB fastening I found the steps quite challening due to the fact that my facing was too short on either side so it didn't meet accurately so I had to sew it as close to the zip as I possibly could. At the start I was worried at how the final outcome would look like and after many attempts of unpicking stitches finally produced the sample behind everybody else!

FINAL RESULT
In my attempt I found aspects challenging and hard
to get accurate but in my final result was better than what I imagined with the retaining row holding the facing in nicely and the interfacing giving the skirt a solid shape.If I were to improve on ths waist facing sample I would stitch neater lines and use precise measurements and moniter the size of the patterns to make sure that I won't have the same problem with the facing being too short in length.

FRONT
BACK

INTERFACING IN MY WAIST FACING WITH CB FASTENING
For this skirt sample we used a heavy iron on interfacing using the pattern from the facing to create 1 on the fold in interfacing. I then managed to iron both patterns of fabric and interfacing together to be then stitched inside my skirt.My facing could have been more accurately ironed on but the overlocking managed to neaten up the rough edges to refine the shape.
INSIDE OF THE SKIRT
Inside the skirt it consisted of a retaining row; facing and interfacing all to provide a finish and shape to the skirt. In my opinion I attempted it to my best effort but I would reconsider attempting this sample another time to allow the my brain to remember the process as I will need to use facings throughout my study in FASHION.The most difficult element featured in this sample was the retaining row as I had to keep a consistent measurement along the ridge and make sure it didn't slip off.THE ZIP - made me very stressed as I kept on stitching it on the wrong side and the wrong way round until eventually I sewed it on correctly. If I were to improve I would stitch straighter lines down the edge next to the zip where the facing connects to the skirt.
RETAINING ROW
ZIPS
FACING

FASHION DICTIONARY
INTERFACING - (HEAVY)it secures a strong, structured shape to garments
(LIGHT)it is used in waistbands, cuffs, collars and facings.
FACING - it finishes the top edge of the garment.
RETAINING ROW - it helps hold down the facing and keep it in place with stitching measuring 0.5cm and sewn closer to the facing.

Tuesday, 28 December 2010

SEAM ALLOWANCE ON THE SIDE SEAM

e

To create this side seam I created a seam allowance of 1.5cm to allow me to resolve any fraying and create a nicer finish. I used a measured piece of masking tape to make sure it was equally 1.5cm all the way round using a pivotal method to make sure my curve was identical to the straight line.