Friday, 6 May 2011

FACING PATTERNS...

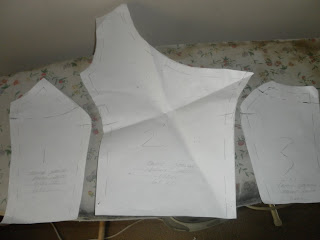
From the patterns that I used to make up the bodice I matched the side seams up to then draw a dotted lines across on where the facing would go. The front was split into 3 sections so I had to sew them together whereas the back was just one piece.I added seam allowance to the bottom to attach it to the bodice I have already created.FRONTBACK

AMMENDING MY PATTERNS AND APPLYING IT TO MY TOILE...

From creating my bodice I realised I had to cut up my original Toile from the design lines I had created and place it on my pattern piece to get the correct curve of the neck line. I made it up and then realised it was gaping a bit at the right bust point so took it in an extra 0.5 cm to make it fit better to the body.BACK PATTERN
DIVIDED INTO 3 SECTIONS
AMENDED DRAFT PATTERNS

FITTED TO THE BODY


ARMHOLE

GAPING AT THE BUST
I managed to fix this minor problem and now the bodice fits really nicely at the bust and back securing an elegant shape.

Wednesday, 4 May 2011

WHAT I HAVE ACHIEVED TODAY . . TOILING WISE

I have managed to complete all my sampling so now I know how to deal with problems and have started to create my patterns for my toile. I have done a mixture of flat patterning and working on the mannequin to both produce my bodice pattern.
1. I have moved a dart and cut out my front and back bodice on the fold.
2. I have sewn in the darts.
3. Pressed them open.
4. Pinned it to the mannequin close to the body making it close fitted. On the arm and shoulder and pinched some fabric to make it a better fit.
5. I then sketched my design lines on to indicate where
I was going to slash and trace off.
6. Amended my patterns .

It doesn't seem like an awful lot but I have managed to ma
ke a start and feel more confident with how my design will pan out.

HOLE IN THE SKIRT... COMPLETE

HOLE


BACK


FRONT

As you well know I have been attempting to create a skirt with a hole in it(believe it or not). After creating this same design in a blue pattern fabric I decided it didn't quite work out so well so I attempted it again in hessian and it worked really nicely. I haven't been able to take any pictures of the one which didn't work out that well but I will let you have a sneak peek don't worry! I think out of the two attempts the Hessian fabric gave a stronger structure and held the shape of the skirt better than the softer fabric as the hessian fabric was a lot harsher and secured the shape and the design lines.

SAMPLING CIRCULAR TECHNIQUES...

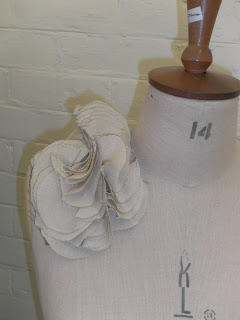
Before I create a toile diary I have to problem solve all the difficult areas so I have been experimenting with different sized circles and ways in which I can tack them together.

BIGGER CIRCLES- I think this worked nice giving excess
volume that uplifts from the body to emphasise the shapes and structure of the bodice.

BACK AND FRONT - I attached both sets of circles that had been tacked together to see if I would get a better idea if I were to use more fabric concentrating on how effective the shoulder would look.

CURVED CIRCLES - I also looked at different ways in which I can sew my circles to fabric so I approached this idea with hand ta
cking in the centre of circles to creating a dipped effect. This technique looked really nice providing an ambiguous direction all swaying at alternate angles. I would attempt this again but pretend the underneath fabric wasn't there and try and figure out how the shapes would hold.
I also tried a similar technique to what I had used on the bigger circles pinning them to create more volume which also worked but I prefer the flat attempt as it looked much neater.

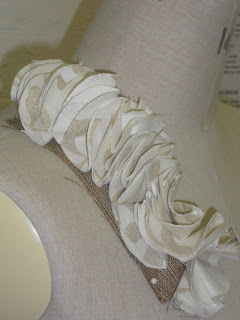
SCRUNCHED CIRCLES - For this I used the circles that I used for the curved circles and attached them closer together pushing the upper row forward giving it a scrunches effect. I like how compact the circles are giving a nice texture and I would consider merging both methods together loosening out as it approached either the bottom of the back or the bust.

CONES - I felt that this technique didn't work because they seemed to separate into different facings making it all look a bit disorientated. If I were to approach this again I would definitely press them down and make sure they are closely fastened.


I combined all three samples together to see how it would work and it looked rather nice with the loose circles at the back slowing opening out and the scrunches circles creating a journey through the fabric which would symbolise my chosen theme.

Tuesday, 3 May 2011

SAMPLING QUILTING TECHNIQUES...

As you have seen throughout my latest blog posts I have started to sample my final design and have continued my experimentation to now start to see which quilting lines are closest to my vision and which will gain the most volume.

1. This technique worked out nicely using the diagonal lines to trap more fullness within the different sections.I could always stitch the lines straighter but it's only a sample, but I think it looks professional and is an even distance spread out for them to stand out more in full scale.
2. I used the technique I am going to continue with but added the lines on and it didn't look nice but it could look different full scale as the lines will spread out and look more professional.
3. I liked this sample because I managed to find a line pattern that complemented the structure of the skirt making smaller sections really made a difference in thickness and volume which I wanted.
4. This was my favourite attempt because the lines were spread out but still compact and used straighter lines and worked nicely with the shape and size of the sample and would prolong even further with the expansion of size.

These are only a few of my samples and I will still continue with this process because if you are or have been a fashion student you will know how long the design process takes!

CREATING A SHIRT...

Finally after a few weeks I have completed my shirt project, I'm telling you it looks easy but believe me it's not! I have managed to learn alternative skills to adapt to future designs and learn how to deal with problems. Obviously, I haven't thought the fabric selection through but hey a little bit of everything doesn't hurt. I have managed to insert a Collar, Pocket, Bishop Sleeves, Pleat and Cuffs ( which I hope to never see again.)

FRONT
BACK COLLAR
BISHOP SLEEVES

PLEAT I am pleased with my final outcome and surprised how much I have learnt through this stressful process but been able to complete is eventually. I am really happy with the pleat I think that was the most successful feature of the garment. I think the cuffs were the trickiest as you can see I'm not too fond of them!